If you own an Ubiquity EdgeRouter (ER-X, ERLite-3, ER-4, ERPoe-5, ERPro-8, etc) and are using the stock EdgeOS firmware, you may be missing opportunities to secure your DNS requests using DNSSEC. There are no GUI options in the EdgeOS browser-based user interface for enabling DNSSEC, as found in most modern router firmware UI configuration options since approximately 2017 and onward.
This guide will help you to enable this feature for Ubiquity EdgeRouter models that have NOT been updated or modified to use 3rd party firmware. As of 2024, the only other known compatible router firmware for Ubiquity EdgeRouter products is OpenWRT. While OpenWRT provides extensive enhancements and virtually unlimited potential feature and function add-on capabilities, the elegance and simply of the EdgeOS UI and the official firmware updates Ubiquity is seemingly committed to provide to its EdgeRouter line of products may be more favorable to many users than the moderate-to-steep learning curve that is required for switching to OpenWRT. It is perhaps also possibly you have reverted to EdgeOS after trying OpenWRT and its performance or feature set is not satisfactory. While OpenWRT is measurably better than EdgeOS, it is not for everyone. So if you seek to enable additional security with the EdgeOS stock firmware from Ubiquity for your EdgeRouter “EdgeMax” model, rather than switch to OpenWRT, then please read on.
Assumptions of Your EdgeRouter Configuration
If you have not deliberately changed the default subnet since purchase (or you have just performed a software “factory reset” or a “pinhole hardware 30-30-30 reset”) and are using stock defaults, then your EdgeRouter subnet/CIDR will be 192.168.1.0/24. This default configuration will use the IP and URL of https://192.168.1.1 to log in and access the ER configuration, which is what is assumed for this guide.
This guide is created with assumptions that your Ubiquity EdgeRouter is currently running EdgeOSv2.0.9-hotfix.7 or similar. Future versions of firmware may change the User Interface (UI) of EdgeOS in some way.
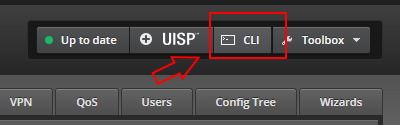
Locating the Floating CLI Prompt in the EdgeOS Web UI
Log in to the EdgeOS web UI and open the CLI prompt for your EdgeRouter (ER) product be using https://192.168.1.1 in the address bar of a supported web browser (or whichever IP Address you have assigned to your EdgeRouter). Input your username (ubnt) and password into the web form and click the Login button.
Once logged in, you will see in the “CLI” option in the top right corner of the EdgeOS UI menu options.
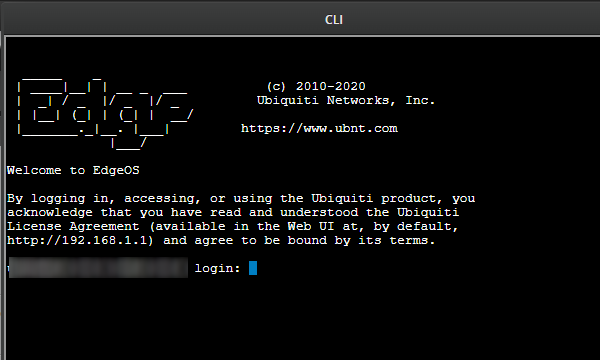
Upon click, wait for up to 15 seconds for the CLI prompt to finish opening and provide you with an opportunity to enter you login username, followed by your password. This will most likely be the same credentials you used to log into the web UI (unless you have added your own users in the EdgeOS “Users” tab option).
Logging in to EdgeOS CLI
This guide assumes ubnt as the username (the default admin user for EdgeOS), but any user with admin privileges that you have the password credentials for will work. Take note that in order to make configuration changes via the CLI prompt, you MUST log in as an admin user, even if you already logged into the web UI interface as an admin.
Once you have entered your admin-capable username and password credentials, you will be able to perform various actions and modifications that are unavailable via the EdgeOS Web UI interface. You will also notice that this CLI prompt windows in your web browser interface is a bit clunky and awkward, if you are used to using tools like Mac Terminal, Linux Terminal or PuTTY (on Windows). You may notice when you right-click on the CLI prompt that you are provided with a limited set of options, some which do not work as you might expect, such as Copy and Paste. For this reason, you will either need to manually type in the below commands “manually”, without copy/paste, or be very careful to ensure that you do not press the ENTER key until you have removed any special or “invisible” characters into the CLI prompt window while you enable DNSSEC on your Ubiquity EdgeRouter. This is particularly important for the commands with longer lines such as the Internet Assigned Numbers Authority (IANA) Trust Anchors used with the set commands.
Enabling DNSSEC on Ubiquity EdgeRouter Products through EdgeOS CLI
One line at a time, enter the following commands into the open and actively logged on CLI prompt window. Please review the #commented lines for details of what each line is doing, and do NOT try to copy and paste more than one line at a time or manually type in each command yourself (keep reading before you try this for yourself for more pointers):
# The 'configure' command sets EdgeOS in "config mode"
configure

# The EdgeOS configuration command to enable the DNSSEC option
set service dns forwarding options dnssec

# The EdgeOS configuration command to enable DNSSEC functionality
set service dns forwarding options dnssec-check-unsigned

# The EdgeOS configuration command to avoid timesync issues
set service dns forwarding options dnssec-no-timecheck

# The EdgeOS configuration command to set root trust anchors
set service dns forwarding options trust-anchor=.,20326,8,2,E06D44B80B8F1D39A95C0B0D7C65D08458E880409BBC683457104237C7F8EC8D

# The EdgeOS configuration command to set root trust anchors
set service dns forwarding options trust-anchor=.,19036,8,2,49AAC11D7B6F6446702E54A1607371607A1A41855200FD2CE1CDDE32F24E8FB5

# The EdgeOS configuration command to enable config changes
commit

# The EdgeOS configuration command to save config changes to persist after reboots
save

# The EdgeOS configuration command to exit 'configure mode'
exit

# The EdgeOS configuration command to immediately reboot (y to confirm)
reboot

## This ends of list of commands needed to enable DNSSEC on EdgeRouter models.
## Remember to enter each line, one at a time.
## Read further below for tips and tricks with successful copy/paste and testing before using 'save' and 'reboot'
Future-Proofing this Guide
To prevent this guide from going “stale” and losing usefulness, or being confusing in future changes that may occur, it is important to note that these trust anchors may change in the future. At the time of this writing in Q1 of 2024, the trust anchors from IANA have NOT been updated since Q4 of 2018, but they may be updated in the future, so if you want to verify they are correct at the time you are reading this, then check this link: https://data.iana.org/root-anchors/root-anchors.xml
EdgeOS CLI Prompt Oddities
Notice in the screenshot below, that using the Copy text function (either right-click > Copy, CMD+C or Ctrl+C, etc) and then right-clicking in the CLI prompt window in EdgeOS web browser UI does NOT work as expected. But it is still possible to “Paste” into the CLI Prompt floating windows in EdgeOS with:
Shift+Ctrl+V
However, when doing the “Paste” in the floating CLI prompt window in the EdgeOS UI web interface, there may be “trailing invisible characters” included that will result in issues. To make matters even worse, the floating CLI prompt window with “text wrap” the longer lines of commands in such a way that makes the end of the text that you paste in appear in strange locations on the same command line (as you can see in the screenshot).
Also, if you copy the text, line by line (as you MUST do, since EdgeOS CLI does not allow for multiple commands entered at once, like PuTTY, Linux or Mac Terminal do) you will likely notice that there are “invisible characters” that suddenly appear when you press the ENTER key. You can simply backspace/delete these invisible trailing characters, but due to the strange line-wrapping behavior from the Shift+Ctrl+V pasting operation, it is sometimes difficult or impossible to have confidence that you have not unintentionally deleted some of the final characters in each line that you want to submit to the EdgeOS configuration.
PRO TIP:
To help you make this easier, you can simply add a SPACE after each Shift+Ctrl+V paste operation, and then press ENTER. This seems to avoid the “trailing invisible character” bug in the CLI prompt, despite the text-wrapping still being a remaining issue.
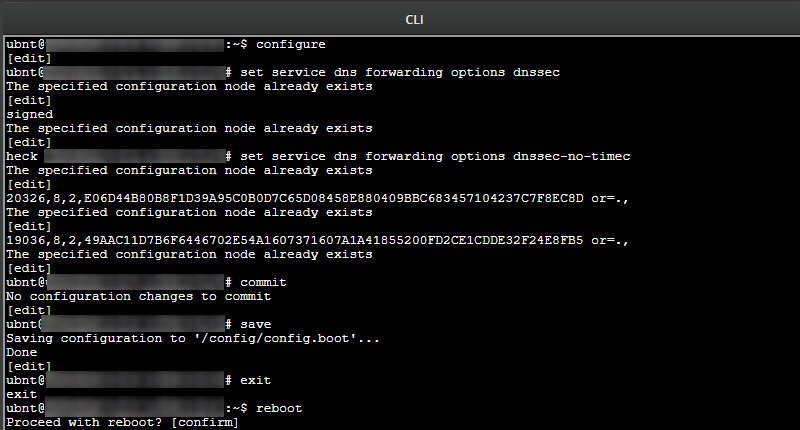
Notice that in the EdgeRouter used for the above screenshot, these commands already existed in the configuration for EdgeOS, so if these commands are already set in the EdgeRouter, you will receive to above message “The specified configuration node already exists”, but in the first initial effort using the commands above, you will not have that output message.
Testing Your Changes to EdgeOS Before Persisting After Reboot
If you want to first ensure that DNSSEC is a viable option for you and your networking needs, but do not yet want to “persist” and the configuration changes on reboots, you can simply skip the save command before exit and then also skip the reboot command. By skipping save and reboot, this will enable DNSSEC until you reboot or power cycle the EdgeRouter. This way, if you experience issues with DNSSEC on your niche network, you can simply “undo” the configuration changes you made with the CLI prompt in the EdgeOS web UI by either rebooting the router, or briefly unplugging it and plugging power back in. This may be a good idea as you will be required to add DNSSEC-capable Name Servers to your System name server list in the System tab menu (located in the bottom left corner of the EdgeOS web UI). If the Name Servers you have configured do not support DNSSEC, you may not have internet access until you change them to Name Servers that do, or you remove the DNSSEC configuration from EdgeOS.
Some known Public DNS Name Server IP addresses that support DNSSEC
- 9.9.9.9 (Quad Nines)
- 9.9.9.11 (Quad Nines)
- 208.67.222.220 (OpenDNS)
- 208.67.222.123 (OpenDNS)
- 1.1.1.1 (Cloudflare)
- 1.0.0.1 (Cloudflare)
For Those Who Run Locally Hosted DNS Servers
If you are using your own locally hosted DNS Server that are connected to the same subnet as your EdgeRouter (eg: A machine with a hostname pi-hole.local configured with a local static IP Address of 192.168.1.2), such as Unbound, Pi-Hole or BIND9, then you can use the IP Address(es) of your local DNS Server(s) in your System name server list, instead (and this is highly recommended for privacy and security reasons). Though, you must enable DNSSEC in your locally hosted DNS Name Server(s), first.
Verifying DNSSEC is enabled on your network
The most simple way to check if DNSSEC is now active on your network, visit The Wander.science project DNSSEC Resolver Test and click the Start test button. If you get a thumbs up after a few seconds, then you should be good to go. It is also a good idea to check DNSLeakTest.com for DNS Leaks anytime you make changes to your DNS configuration.
If you want to performance test the available upstream DNSSEC-enabled Public DNS providers, you can also download DNS Benchmark from GRC.com for testing a variety of Local and/or Public DNS servers and configurations (recommended Freeware). To test for DNSSEC-enabled servers from DNS Benchmark, right-click anywhere inside the open window (NOT on the title bar, which has even more options for you to test with) then click the bottom option to enable ‘Test DNSSEC Authentication’ and the click ‘Yes’ to re-characterize the available resolvers. Any available DNSSEC capable servers with show as the color Green after that. Choose the best and fasters DNS servers available to your network for optimal internet performance.
Sources:
- Ubiquity EdgeRouter Information:
- Official Ubiquity Firmware download site – https://www.ui.com/download
- UI Community Forum Q/A regarding DNSSEC – https://community.ui.com/questions/DNSSEC-should-i-be-using-it/e5dbd3f3-af02-4966-80db-f8edbc99f608#answer/fe218f25-f39b-45c9-995a-fd7884b481f9
- UI Community Forum Q/A regarding how to change, commit and save config to persist on reboots
- https://community.ui.com/questions/Edge-Router-x-Mac-address/052e3556-acd7-47f3-8e92-c21a66294993#answer/76aa579b-7fe2-4e3e-80cb-f6a79a068e26
- https://help.ui.com/hc/en-us/articles/204960094-EdgeRouter-Configuration-and-Operational-Mode
- How to “undo” or “unset” configure commands in EdgeOS with
delete– https://community.ui.com/questions/How-can-unset-modify-rules-in-EdgeRouter-PoE/2e9c6bd6-5593-483e-8901-58cb2baf02eb - DNSSEC settings information:
- Explanation of the importance of enabling the
dnssec-check-unsigned option– https://www.suse.com/support/kb/doc/?id=000020508 - Example of Issues avoided by using the
dnssec-no-timecheckoption – https://github.com/systemd/systemd/issues/5873
- Explanation of the importance of enabling the
- Official Sources of “Internet Governance”
- Internet Assigned Numbers Authority (IANA) root-anchors (trust anchors)
- https://data.iana.org/root-anchors/root-anchors.xml
- https://www.iana.org/dnssec/files
- Minimal List of DNS Server software that supports DNSSEC (from 2013) – https://www.internetsociety.org/resources/deploy360/2013/dns-servers-supporting-dnssec/
- Progress of DNSSEC proliferation – https://dnssec-deployment.icann.org/en/dnssec/
- Internet Assigned Numbers Authority (IANA) root-anchors (trust anchors)
- DNSSEC Tools
- DNS Benchmark (right-click to enable ‘Test DNSSEC Authentication’ and click ‘Yes’) – https://www.grc.com/dns/benchmark.htm
- Super Simple DNSSEC Resolver Test – https://wander.science/projects/dns/dnssec-resolver-test/